


Standard US magazine ad sizes fall into nine common units, and the single most important step before you design anything is to pull the target publication’s media kit. No two publishers use identical dimensions. Most US consumer magazines use full-page trim sizes between 8.125" x 10.75" and 8.875" x 10.875", with a 0.125" bleed required on all four sides. Here is a fast-reference summary of the standard units and the non-negotiable file settings:
Standard ad units (typical US magazine dimensions):
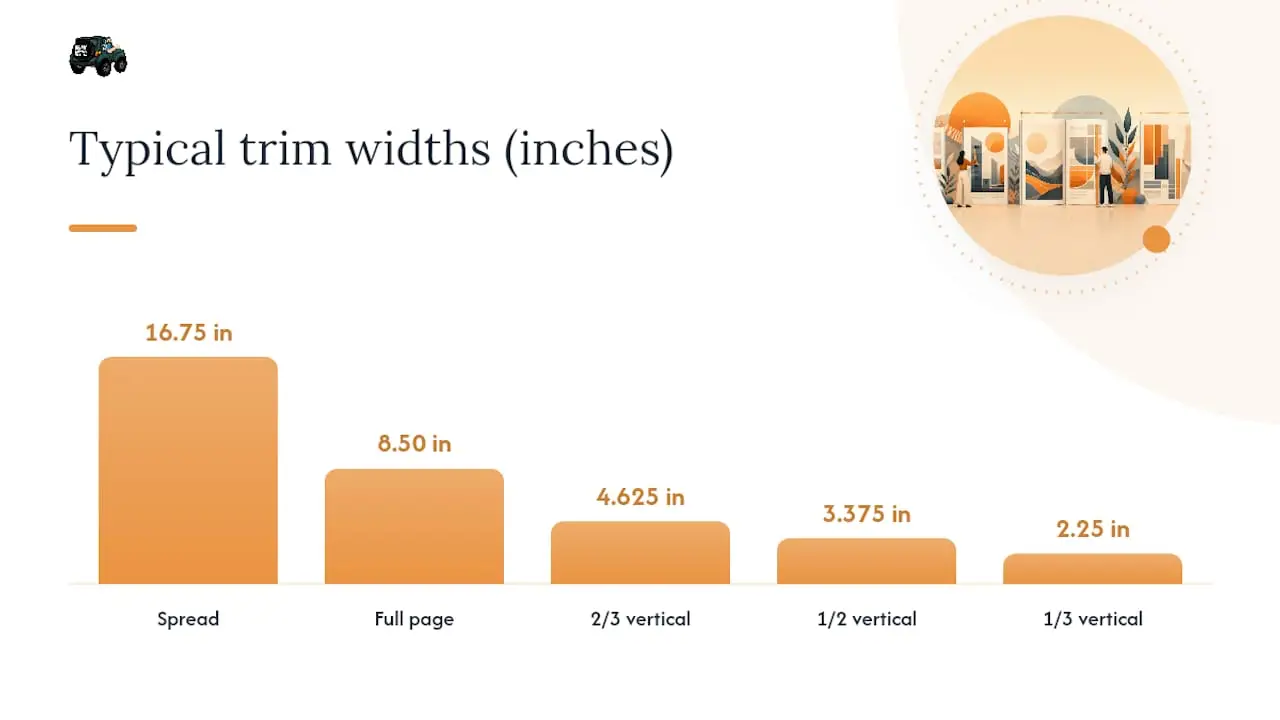
- Spread (2-page): ~16.75" x 10.75" trim; 17" x 11" bleed
- Full page: ~8.125"–8.875" x 10.75"–10.875" trim; add 0.125" per side for bleed
- 2/3 vertical: ~4.625" x 9.5" trim
- 2/3 horizontal: ~7" x 6.5" trim
- 1/2 horizontal: ~7" x 4.875" trim
- 1/2 vertical: ~3.375" x 9.5" trim
- 1/3 vertical: ~2.25" x 9.5" trim
- 1/3 horizontal: ~7" x 3.125" trim
- 1/3 square: ~4.625" x 4.875" trim
- 1/4 page: ~3.5"–3.625" x 4.55"–4.75" trim (varies by column grid)
- 1/6 page: ~2.25" x 4.875" trim
Non-negotiable file settings: build at 100% trim size; bleed 0.125" per side; live/safety area 0.25" inside trim; images at 300 PPI; color in CMYK; fonts embedded or outlined; export as PDF/X-1a. Always confirm final values against the publication’s official media kit before you export.
Key Takeaways
Correct magazine ad dimensions start with the publication’s media kit; every other spec flows from those confirmed trim, bleed, and live-area values.
| Point | Details |
|---|---|
| Always pull the media kit first | Publisher trim sizes range from 8.125" x 10.75" to 8.875" x 10.875"; confirm before you build. |
| Build to bleed, not trim | Add 0.125" bleed on all sides for full-bleed ads to prevent white slivers after cutting. |
| 300 PPI and CMYK are required | Set image resolution at 300 PPI at final size and convert all colors to CMYK before export. |
| Quarter-page size varies by grid | A 1/4-page unit can be 3.5" x 4.75" or 3.625" x 4.55" depending on the publisher’s column grid. |
| 16wmediagroup manages the full process | Ad design, preflight, and submission coordination for local and regional magazine placements. |
Table of Contents
- What are the standard magazine ad sizes for US publications?
- How do you set up a magazine ad document correctly?
- Why does a quarter page ad size vary between publishers?
- What should your file submission package include?
- How 16wmediagroup handles specs, proofs, and QC
- Why every designer should standardize their export workflow
- 16wmediagroup’s design, proofing, and submission services
- Sources
What are the standard magazine ad sizes for US publications?
The dimensions above are starting points, not guarantees. Scientific American’s spec sheet shows a full-page trim of exactly 8.125" x 10.75" with a bleed of 8.375" x 11", which illustrates how precisely publishers define these values. Use those numbers as a design template, then swap in the actual publication’s figures once you have the media kit.
| Ad Unit | Typical Trim (inches) | Bleed Size (inches) | Notes |
|---|---|---|---|
| Spread | 16.75 x 10.75 | 17 x 11 | Supply as single spread PDF; check gutter safety |
| Full page | 8.125–8.875 x 10.75–10.875 | Add 0.125" per side | Most common range for US consumer titles |
| 2/3 vertical | 4.625 x 9.5 | 4.875 x 9.5 | Bleed on open edges only if applicable |
| 2/3 horizontal | 7 x 6.5 | 7 x 6.5 | Less common; confirm with publisher |
| 1/2 horizontal | 7 x 4.875 | 7 x 4.875 | Standard island or horizontal half |
| 1/2 vertical | 3.375 x 9.5 | 3.625 x 4.55 | Often called a “junior page” |
| 1/3 vertical | 2.25 x 9.5 | 2.25 x 4.875 | Column-width dependent |
| 1/3 horizontal | 7 x 3.125 | 7 x 3.125 | Confirm depth with publisher |
| 1/3 square | 4.625 x 4.875 | 4.625 x 4.875 | Not universal; check media kit |
| 1/4 page | 3.5–3.625 x 4.55–4.75 | Add 0.125" per side | Varies significantly by column grid |
| 1/6 page | 2.25 x 4.875 | 2.25 x 4.875 | Often non-bleed; confirm |
Pro Tip: Use bleed only when your creative extends to the page edge. For contained ads with white borders, non-bleed files are fine and simpler to produce. Always ask the publisher which they expect before you build.
Publishers like Hearst/Prevention supply separate live/type area values smaller than trim to protect text from the cutter. Follow those live-area figures exactly, not just the trim.
How do you set up a magazine ad document correctly?
Get the document right before you place a single image. New York Media’s production guidelines specify 0.125" bleed on each side, a type safety of 0.375" in from trim, and crop/registration marks offset at 12 points so marks never invade the live area. Here is the exact sequence to follow in InDesign, Illustrator, or Photoshop:
- Set page size to trim dimensions. Enter the publisher’s exact trim width and height, not the bleed size. InDesign and Illustrator treat the document page as trim.
- Add 0.125" bleed on all four sides. In InDesign, enter this in Document Setup > Bleed. For full-bleed ads, extend all background art and photos to the bleed edge.
- Set slug/printer marks offset. Use at least 0.125" (9 pt) offset so crop marks clear the bleed area. New York Media requires 12 pt.
- Place images at 300 PPI at final print size. Scaling a 72 PPI image up to fill a full page will not pass preflight. Check effective resolution in InDesign’s Links panel.
- Convert all colors to CMYK. RGB and Pantone spot colors must be converted before export. Confirm the publisher’s preferred CMYK profile (typically US Web Coated SWOP v2 or a publisher-supplied ICC profile).
- Embed or outline all fonts. Never submit a file with missing fonts. Outlining type in Illustrator is the safest route for logos; embedding works well for body text in InDesign.
- Flatten transparency if required. Some publishers still require flattened PDFs. Check the spec sheet.
- Export as PDF/X-1a (or the publisher’s specified PDF standard). This preset locks color, embeds fonts, and includes bleed automatically when set up correctly.
Pro Tip: Building to trim + bleed from step one prevents the most common production error: supplying a file sized only to trim for a full-bleed ad. The printer needs that extra 0.125" to absorb mechanical cutting shifts. Without it, you get a white sliver at the page edge after trimming, and that means a reprint request.
Run Acrobat’s preflight tool or InDesign’s built-in preflight panel before you upload. Check for RGB images, missing fonts, low-resolution art, and incorrect page dimensions.
Why does a quarter page ad size vary between publishers?
The answer is column grids. Publishers divide their page width into columns, and fractional ad units are defined by how many columns they span. New York Times column widths follow a grid where 1 column = 1.8", 2 columns = 3.75", 3 columns = 5.7", 4 columns = 7.65", 5 columns = 9.6", and 6 columns = 11.55". A full broadsheet page is commonly expressed as 6 columns by 21".

This is why a quarter-page ad is not a fixed size. In a 5-column magazine, a quarter-page might span 2 columns and a specific depth. In a 6-column layout, the same fractional unit spans a different width entirely. Real media kits confirm this: JOSPT’s advertiser specs list quarter-page dimensions as either 3.5" x 4.75" or 3.625" x 4.55" depending on the publication’s grid.
A few things to keep in mind when working with column-based sizing:
- Compute column-based width as: (column width x number of columns) minus any gutter allowance the publisher specifies.
- Depth (height) often varies by section within the same publication, not just by ad unit.
- Publishers sometimes reduce supplied artwork by 2–6% during production to accommodate press widths, so build with enough visual breathing room near the edges.
- When a publisher books ads in “column x depth” units rather than inches, confirm the conversion before you build the file.
For local campaigns, multiple smaller insertions can sometimes outperform a single large ad on cost-efficiency. Full-page recall is higher in absolute terms, but cost-per-recall-point can favor half-page or quarter-page placements when budget is the constraint.
What should your file submission package include?
Publishers expect a specific package, and missing one element can delay insertion or trigger a late-materials charge. Here is what to prepare:
File requirements:
- PDF/X-1a (preferred by most US publishers) or the format specified in the media kit
- 300 PPI images at final print size, CMYK color, fonts embedded or outlined
- Bleed included for full-bleed ads; crop marks offset so they clear the bleed
- No incorrect overprint settings (check black text is set to overprint; images are not)
What to deliver:
- Single-page PDFs for individual ad units; a single two-page spread PDF for spreads (confirm whether the publisher wants spreads as one file or two separate pages)
- Native packaged files (InDesign package or Illustrator with linked assets) if the publisher requests them
- Color proof or soft proof PDF if required by the publisher’s production team
- Contact name, phone, and email for the production coordinator in case of questions
Submission logistics:
- Use the publisher’s ad portal, FTP, or approved file-transfer link. Never email large files unless the publisher explicitly allows it.
- Name files clearly:
PublicationName_AdUnit_Issue_Version.pdf(e.g.,TampaMag_FullPage_Aug2026_v2.pdf) - Confirm the materials deadline, not just the space close date. Materials deadlines are typically 1–2 weeks after space close.
- Request a confirmation email or upload receipt from the publisher’s production team.
How 16wmediagroup handles specs, proofs, and QC
The single biggest time-saver in print production is a standardized preflight workflow confirmed against the actual media kit, not a generic checklist. Before any file leaves our hands, we pull the publication’s current spec sheet, because publishers update their requirements and an outdated spec is a reprint waiting to happen.
Here is the agency checklist we run on every placement:
- Verify trim, bleed, and live-area dimensions directly from the publication’s media kit
- Run a full preflight in Adobe Acrobat Pro or InDesign’s preflight panel: check resolution, color mode, font embedding, and page dimensions
- Supply PDF/X-1a as the default; provide a native packaged file on request
- Confirm proof requirements with the publisher’s production contact before sending
- Track revision versions with a clear naming convention and log delivery confirmation
Pro Tip: Request a contract proof from your print vendor when color accuracy is critical, such as brand-color-heavy ads or food photography. A soft proof on screen is not sufficient for high-stakes color matching. For print advertising, the proof is your insurance policy.
For spreads, we confirm whether the publication is saddle-stitched or perfect-bound, because gutter safety values differ. A saddle-stitched book needs less gutter allowance than a perfect-bound one, where pages pull inward near the spine.
Why every designer should standardize their export workflow
Most production errors in print advertising are not creative failures. They are process failures. A designer who builds a fresh document from scratch for every placement, guessing at bleed values or forgetting to convert RGB images, is one missed step away from a reprint charge or a missed insertion date.
Standardizing your export settings, a saved InDesign document preset with the correct bleed, a PDF/X-1a export preset, a CMYK color profile, and a preflight profile you run before every export, removes the guesswork entirely. The first time you catch a low-resolution image or an RGB photo in preflight rather than after the publisher rejects the file, you will understand why the workflow matters more than the individual file.
The most common failure mode is simple: a designer submits a file built to trim size for a full-bleed ad because the brief said “8.125 x 10.75” and nobody mentioned bleed. The publisher’s cutter shifts slightly, and the background color stops 1/16" short of the edge. That is a white sliver, a rejection, and a scramble to fix and resubmit before deadline. A saved bleed preset costs nothing and prevents it every time; following these visual content in marketing best practices ensures your ad stands out and engages effectively.
Adopt a short agency-style preflight checklist. Run it before every export. Treat it as non-negotiable.
16wmediagroup’s design, proofing, and submission services
Getting magazine ad dimensions right is one part of the equation. Getting the ad placed, proofed, and confirmed on time is another. 16wmediagroup handles both for local and regional businesses that want print results without the production headaches.
Our team manages ad design to publisher spec, preflight review, vendor coordination, and full submission management for community and regional magazines. You bring the brand; we handle the spec sheet, the file prep, and the production contact. For businesses running multi-placement campaigns, we also coordinate local media planning across multiple publications so every unit is sized, formatted, and delivered correctly.
Ready to place your next magazine ad without the back-and-forth? Visit our services page to request a specs check or start a preflight review today.
Sources
Use these as starting points, then confirm every value against the specific publication’s current media kit before you export.
The publisher’s own media kit is always the final authority. Confirm the submission portal, accepted file format, and materials deadline directly with the publication’s production contact before you send anything.